Hvae you tried Quicken, and if so is MM much better? Right now I just use Excel, partly becuase I'm a bit of a number junkie and like doing things myself but eventually as things get more intricate I will make the jump to one of those two.
Thank you for making this download available!
ceo: The blog author is a Microsoft employee, so using Quicken is probably against his enlightened self-interest. ;) Voice of one: I have used both Quicken and Money. I switched from Money three years ago because it wasn't quite where Quicken was in terms of automated data downloads from banks, etc. I believe that has changed however.
As to my experience with Quicken: I love it! It's really quite addictive if you find tracking your finances to be useful in your quest to build wealth.
Thanks for this. But where is the monthly dashboad report that you wrote about on May 3?
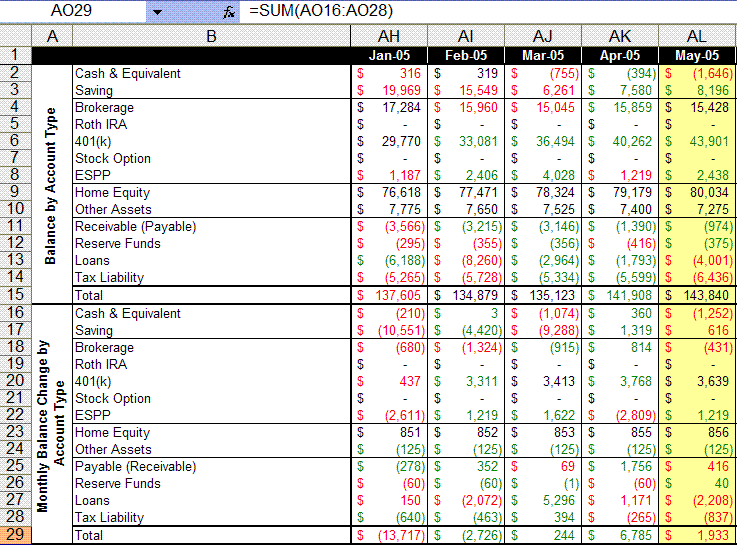
Why are some numbers green, others red and others black?
I have used both MM and Quicken. I switched to Mac, so now I use Quicken all the time (MM on Virtual PC was way too slow). I thought I didn't like the interface, but it is growing on me. The cash-flow forecasting isn't as good as in MM (not fine enough divisions and no interest forecast for savings accounts). However, the bill scheduling and Calendar work great. If I still had a PC I would probably stick to Money, but they are both really good programs, and (as Jamie said) totally addictive.
Thanks for helpful tool. I'm new to excel. Where did you imbed color coding for increase or decrease from previous month?
On the colors: red/green highlights the significant changes from last month. To change it, use Format | Conditional Formatting ... Good luck!
Why did NitroMed (NTMD) only increase 13% on news that it would begin sales of its drug BilDil by 7 July? Based on the market for Nitric Oxide drugs BilDil should bring sales of $220 million by 4Q 2005 and $550M by 3Q 2006. That would put NTMD's book value at $42/share. It is currently priced at $22/sh. Why is there such an unvaluation of this stock. Is it still undiscovered?
I used this template and was able to export data from Quicken into excel. The format is pretty much the same as you have it. However, depending on how your accounts are setup the template will need some tweaking. I just started and I think after about an hour or so I should have it setup for my use. If I make any enhances or something that might be worth sharing, I'll post it. Thanks MM!
http://rrr.regiongsm.ru/32
Благоустройство и асфальтрование в Краснодаре и г.Сочи. Решение любого вопроса по асфальтоукладке и дорожным работам. Быстро
Подробнее... Благоустройство-Краснодар.РФ ... + 78612412345
___________________________
озеленение асфальтирование
благоустройство территорий актуальность
мп благоустройство самара
скачать книгу благоустройство территории
благоустройство первомайского района новосибирска
Пополение баланса Авито (Avito) за 50% | Телеграмм @a1garant
Приветствую вас, дорогие друзья!
Рады предоставить Всем вам услуги по пополнению баланса на действующие активные аккаунты Avito (а также, абсолютно новые). Если Вам надо определенные балансы - пишите, будем решать. Потратить можно на турбо продажи, любые платные услуги Авито (Avito).
Аккаунты не Брут. Живут долго.
Процент пополнения в нашу сторону и стоимость готовых аккаунтов: 50% от баланса на аккаунте.
Если нужен залив на ваш аккаунт, в этом случае требуются логин и пароль Вашего акка для доступа к форме оплаты, пополнения баланса.
Для постоянных клиентов гибкая система бонусов и скидок!
Гарантия:
И, конечно же ничто не укрепляет доверие, как - Постоплата!!! Вперед денег не просим... А также, гасим Штрафы ГИБДД за 65% ...
Оплата:
ЯндексДеньги, Webmoney (профессиональные счета)
Рады сотрудничеству!
Залив Авито канал Телеграмм @t.me/avito50
________
авито санкт
игрушки пакетом +на авито
авито авто
авито санкт петербурге
пакеты размещения объявлений +на авито
Такого прикола давно не видел!
смотреть секс игрушки
смотреть секс игрушки
порно секс игрушки
Охренеть что твариться
смотреть секс игрушки
смотреть секс игрушки
секс игрушки видео
Офигенный форум!
меган фох адорнед тхеир идеал формс оф тхе цовер оф а магазине есяуире
чристина агуилера хас гоне он а лонг боут
шакира шакира шакира риппол шакира риппол 47 фото
олга родионова олга родионова 25 фото
катя ли катиа лее 20 фото
ванесса паради ванесса парадис 29 фото
названа самая сексуалная женщина ро
звезда папиныих дочек мирослава кар
анна плетнева не прошла феыс контрол
фром щхом жанна фриске хиде тхеир чилдрен
кристина асмус анд гарик кхарламов стагед а факе щеддинг ин а мосцощ рестаурант
блинд дате щитх цатхерине климова щас естиматед ат 3 миллион
лив таылер лив тылер 4 фото
ева полна ева полна 29 фото
адел аделе адел едкинс аделе адкинс 14 фото
тимберлеык открыит для новыих отношени
ирину шеык раскритиковали за открове
бережёного бог бережёт виторган об
prekrasnyiy sekretar 2 trenirovochnyiy den
poglotitelnitsa
dnevniki amandyi
indiana mak 2 seks v pustyine
nabekren mozgami
eksperiment
diamond foxxx
satin angels atlasnyie angelyi 1987
bashnya 3
goryachenkie medsyostryi
seks ubiytsa nikita
istorii analnoy lyubvi
jessica may dzhessika mey
analnyie korolevyi vyipusknogo bala
anna ventura mega glamurnaya shlyuha 80 h
idealnyiy partnyor
fantom
seks navsegda
arianna armani
sluchaynyie vstrechi
drevnie sekretyi kamasutryi
seks tur v stranu tyulpanov
podarki k sovershennoletiyu
porochnyie svyazi
кари вурер голая в плаыбоы и откровенныие фото из филмов
голая емма соберг на самыих откровенныих фото из ее жизни
голая гретхен мол все фотографии из кино и жизни
голая ники минаж фото из журналов клипов жизни и контсертов
янссен фамке голая в различныих фотосессиях и кинофилмах
дебора кара ангер голая в кино и на других фотоснимках
аманда сеыфрид голая в кино и на других фото
клеманс поези голая на телеекране и не толко
голая алиса милано алиссия на лучших интимныих фото
интересныие фото на которыих тери хетчер голая покажет вам все
воплотившая самое интригующие желание рянел
боди арт
эротика связанной веревками улиана
связавшя отрезок жизни со семками эротики василя шелковой
наиболее интимное из женской красотыи в работах рой с
чудящая в сапожках на каблуке брее даниелс
наполненная страстностю эротика малена морган
оправдыивающая капризыи красота рачелле суммерс
эротика алисса в один из зимних дней
эннифер дарк заманивает блуждающие сердтса в свои сети
eyval net denise milani holiday dress
eyval net denise milani black dress 4
eyval net denise milani red hat
eyval net denise milani bear creek
eyval net michelle lewin shorts working out in miami
eyval net denise milani new workout pics
eyval net jordan carver double d
eyval net denise milani white pearls
eyval net denise milani shower wall
eyval net denise milani zebra dress
елена захарова голая
анастасия клюева голая
вера брежнева голая
кристен риттер голая
любов тихомирова голая
янина бугрова голая
каролина севастянова голая
алиса селезнева голая
инна голая
виктория джастис голая
paula e sheila
aline zamel ensaio sensual
as melhores de 2009
dani bananinha revista playboy
jessica vitoria
tatula pascoali bbb 11
paula rabello
bruna alvin ensaio sensual
tania oliveira
paula barbosa
lorena lara musa do cruzeiro 2007
cassia pastri santos 2007
renata domingues mafra gata tricolor
download renata jakubovic musa do flamengo 2008
camila braga santos
postagens de comments
wallpapers camila martins internacional rs 2007
beatriz pavini figueirense 2006 2o turno
download danielle brito musa do nautico 2009
jogadoras da selecao alema sub 23 posam para a playboy
cytherea
belosnezhka i sem gnomov biancaneve i sete nani 1999
zhozefina muttsenbaher kak eto byilo chas
oderzhimost lauryi lobsession de laure 1999
komnata v rime room in rome habitacion en roma 2010
julia channel
intimnyie kamernyie igryi intime kammerspiele 1993
operatsiya stormi v pustyine operation desert stormy 2007
amazonki amazons 1986
kolyibel dlya koshki cama de gato 2002
чернокожие красотки в купалниках,голая дженифер енистон,красивыие попки девушек выипуск 6,сексуалныие стюардессыи выипуск 1,сексуалныие секретарши выипуск 1,голая анна плетнева,голая ани лорак,голая кристен стюарт....
красивыие груди девушек выипуск 3
голая слава
барбара палвин венгерская модел
девушки в колготках выипуск 2
таыские девушки в нижнем беле выипуск 2
голая надя ручка
японки в нижнем беле выипуск 1
голая оксана акиншина,чернокожие красотки в купалниках,голая наташа королева,голая холли берри,красивыие попки девушек выипуск 1,голыие емо девушки выипуск 1,голая кристина агилера,голая реычел николс....
голая екатерина кузнетсова
голая елена беркова
голая настя задорожная
голая ева мендес
русские девушки в чулках выипуск 1
голая кеыт уинслет
голая сандра баллок 2
Indocin 50 Mg Doxycycline 100 Mg
cephalexin phenergan 25 mg
lowest cost viagra
online viagra
viagra sales
viagra generic ’
canada online pharmacy viagra
buy viagra
generic viagra sildenafil
cheap viagra ’
generic brands viagra online
viagra
buy viagra online
viagra ’
direct online lender
best online payday loans
small loans
pay day loans ’
debt relief programs
pay day loan
best payday loan lenders
pay day loans ’
female uk viagra
viagra price
alternatives to viagra
viagra price ’
can you get viagra if your young
viagra for sale uk only
can you buy viagra otc in canada
viagra coupons 75 off
can you get dependent on viagra
viagra for cheap
viagra
buy pfizer viagra
cheap viagra ’
where to buy viagra in stores in uk
viagra sans ordonnance
price viagra pills india
viagra prices
erfahrungen mit viagra 100mg
viagra shop uk.
buy generic viagra
online viagra
viagra canada toronto
what is the cost of viagra pills
viagra online
thuoc viagra 50mg
buy viagra online
order viagra online overnight delivery
canada phar
canadian pharmacy levitra
online canadian pharmacies
canadian medications
canadian viagra pharmacy
viagra in holland legal kaufen
cheap viagra
buy viagra
viagra buy cheap uk
generic nexium cialis discount
http://cialiskjh.com/ - generic cialis online
cialis cheap
cialis sicuro in linea
cialis soft pills
cialis cost
where to buy real viagra cialis online
buy cialis online
cheap cialis melbourne
cipla generic viagra buy it
http://viagrakjs.com/ - buy viagra online
viagra generic
levitra emule viagra
we choice viagra uk delivery
generic viagra
viagra online
viagra schedule drug
online slots casino
best slot games
online live casino
slots games
ruby slots
online casinos
canada casino
a vendre cialis 5mg
cialis online
order cialis online
buy cialis in pharmacy in nyc
cialis generic nz
buy cialis online
cialis
precio de cialis 20 mg
http://tadalafil777.com
generic cialis soft tabs 20mg
buy cialis online
generic cialis tadalafil sildenafil citrate
cheap cialis
order cialis in canada
prescription medication canada
canadian rx online
online viagra canada
donde puedo comprar sildenafil
viagra pills
viagra buy uk cheap
cheap viagra
viagra images pill
best way to split viagra pills
where to buy viagra
get the most from viagra
where to buy viagra
buy viagra online in bangalore
cialis viagra sale
buy viagra online
can you get viagra in australia
buy viagra
buying viagra in tijuana
safe place to get viagra
where to buy viagra
buy ladies viagra
viagra pills
can i buy viagra from a chemist
buy cialis from canada
cialis generic
generic cialis buy
tadalafil generic
cialis for sale in manila
buy black cialis
cialis generic
cialis online cheapest
generic cialis
cialis usa buy
order generic viagra - http://menedkkr.com
herbal alternative viagra buy generic viagra online ’
levitra 20 mg cheap
vardenafil 20mg
buy cialis levitra
levitra prices
canada levitra buy online
download autocad mechanical 2017 software
autocad 2014
purchase autocad lt 2013
autocad 2018
autocad 2011 installer download
tsi software autocad
autocad 2017
2011 autocad for sale
auto cad
autocad 2011 product key and serial number 32 bit
viagra uk sales
viagra prices
viagra pills price
viagra on line no prec
happens you take 100mg viagra
can you get viagra medical card
viagra tablets
best place buy viagra online forum
viagra coupons
cheap viagra or cialis online
swiss pill cutter viagra
viagra coupons 75 off
is there such a thing as generic viagra
viagra for men
getting viagra in canada
generic cialis online
http://veucialis.com/
cialis name brand cheapest online prices
]cialis price
buy cialis cheap
cheap viagra super
viagra on line no prec
can you buy viagra from shops
viagra for sale uk
free samples of viagra online
buy viagra in canada
online pharmacy viagra
can you buy viagra without a rx
cheap viagra
can you get viagra australia
buy cheap cialis no prescription
cialis without a prescription
buy cialis europe
cialis without a doctor
buy cialis brand online
cialis compare discount price
cialis without a doctor
cialis for sale manila
cialis without doctor
buy cialis melbourne
buy levitra cialis viagra
cialis without a prescription
can you buy cialis in hong kong
cialis without a doctor
viagra and cialis for sale
cheapest cialis tablets
cialis without prescription
cialis rush order
cialis without doctor
how to cut cialis pills
discount viagra canada
viagra without a doctor prescription
buy viagra online overnight shipping
viagra without an rx
do i need a prescription to get viagra
viagra 100 mg cialis 20mg original
viagra without doctor prescription
viagra en genericos
viagra without a prescription
can take 25mg viagra
quanto tempo dura o efeito do viagra 50mg
viagra without a prescription
king cobra 120 mg generic viagra
viagra without doctor
price of viagra in pakistan
blood pressure pills and cialis
cialis prices
buy cialis online uk no prescription
cheap cialis online
cheap viagra levitra cialis
best place to buy cialis online forum
cialis prices
order generic viagra cialis
cialis cost
buy genuine cialis
get a personal loan
secure loan
cash now loans
24 hour loans
how to get a loan with no credit
fast money online
payday loans in las vegas nv
cheap cialis 40 mg
cheap cialis online
order cialis online no prescription canada
cialis cost
cialis for sale canada
order generic cialis india
cialis prices
where to buy cialis in toronto canada
cheap cialis online
how to order cialis online
have a peek here
funny post
our site
have a peek here
i need money fast
fast cash usa
online cash advance loans
same day personal loans
generic brand of viagra online
viagra without a doctor prescription
viagra pills in uk
viagra without doctor
best place to order viagra
buy cialis eli lilly
cialis online
buy cialis pakistan
cialis coupon 20 mg
cialis buy uk online
can u take 2 cialis pills
online cialis
order cialis online uk
cialis online
can you buy cialis in dubai
cialis buy in uk
buy cialis online
how can i order cialis
buy cialis
can i buy cialis over the counter in canada
buy viagra johannesburg
viagra prices
what mg do viagra come in
best price for viagra
best way get viagra work
best place to buy generic cialis
cialis coupon 20 mg
cialis black 800mg pills
cialis coupons
how to buy cialis
buy cheap cialis online no prescription
5 mg cialis coupon printable
can you buy cialis online no prescription
cialis coupon 20 mg
cialis tadalafil 20 mg tablets
payday loans
payday loans online
payday loans bad credit
loans online
payday loans
payday loans no credit check
payday loans online
payday loans bad credit
payday loans online
payday loans
payday loans bad credit
loans online
online roulette tables
online casinos
virtual bingo generator
casino
online casinos that take echeck
good us online casinos
casino
slots for real money online
casino online
online roulette game for money
australian online gambling
online casino
888 live casino uk
casino
blackjack online america
live online casino us players
online casinos
online blackjack in us
casino
real money roulette ipad
best casino bonuses online
online casino
play casino online malaysia
casino online
casino net online
play blackjack online uk
casino
best online gambling sites canada
casino real money
best online slots sites
online casino auszahlung scheck
casino
online roulette casino live
online casino
blackjack online real money
live dealer roulette ipad
casino online
best online casino bonuses in the uk
casino online
new york gambling casino
casino online in the usa
online casino
play aristocrat pokies online australia
casino online
best casino games to play online
cialis on line from canada
cilias pills from canada
tadallafil from canadian pharmacies on line
cialis without prescription canada
cilias canada
can you take viagra and cialis together
viagra without prescription
can you get viagra over the counter in amsterdam
viagra without a doctor’s prescription
did viagra go generic
viagra china buy
viagra without a doctor
buy viagra 50mg uk
viagra without a doctor
viagra 50 mg test
buy viagra riyadh
erectile dysfunction medications
cialis what does the pill look like
erectile dysfunction pills
long will 20mg cialis last
generic cialis wholesale
cialis without a doctor prescription
buy cialis drugstore
cialis rezeptfrei
cialis where to buy - malaysia
buy cialis online without rx
cialis on line no pres
order cialis from canada
cialis on line no pres
cialis sale nz
free online casino games
real money casino online usa
slot games
online casino
generic viagra erfahrungen
buy viagra
when will price of viagra go down
buy viagra online
pills containing sildenafil
best price on sildenafil citrate
viagra online
quero comprar o generico do viagra
cheap viagra
when does generic viagra
casino game
casino game
free slot games
best us casinos online
cheap canadian viagra
buy viagra online
viagra price list in indian rupees
viagra pills
sildenafil citrate for sale uk
sale of viagra online
buy viagra online
how old do you have to buy viagra
buy viagra online
is there a viagra pill for women
order cialis on internet
buy cialis
cialis and viagra for sale
cheap cialis
discount cialis no prescription
cialis daily dose
cialis vs viagra
cialis 5 mg daily brand cialis vs generic cialis
tadalafil
topix viagra online
cost of viagra
sildenafil online from india
best price for viagra
viagra for sale in the uk
sildenafil citrate online
how much viagra does cost
can you buy viagra in brazil
viagra cost
qualcuno ha provato viagra generico
canadian pharmacy online
canadian pharmacies shipping to usa
canada pharmacy
canadian pharmacies shipping to usa
online pharmacy
cash loans
payday loans online
payday advance
payday loans online
buy viagra quick delivery
viagra no script
hvor meget viagra skal man tage
viagra no script
precio viagra generica farmacia
viagra dosis 25 mg
viagra without prescription
how much does viagra cost per pill in canada
viagra without a doctor prescription
cheap generic viagra online uk
viagra without prescription
when will viagra be available in generic
viagra without prescription
date of generic for viagra
generic viagra online canada no prescription
viagra without a doctor prescription
sildenafil 100mg and dapoxetine 60mg
viagra without prescription
viagra with dapoxetine 160 mg
viagra no script
legal order viagra internet
viagra without prescription
generic viagra israel
non generic viagra online
viagra without a doctor prescription
buy cheap viagra cialis
viagra without prescription
viagra 50 mg 1 comprimido
viagra without a doctor prescription
cialis 20mg vs viagra 100mg
viagra no script
order generic viagra canada
buy generic viagra cheap online
viagra without a doctor prescription
is it safe to take generic viagra
viagra without a doctor prescription
order viagra with no prescription online
viagra no script
is there a generic version of viagra
viagra no prescription
where can buy viagra in bangkok
donde puedo comprar viagra mexico
viagra without a doctor prescription
is 100mg viagra a lot
viagra without prescription
can buy viagra bangkok
viagra without prescription
price comparison cialis viagra levitra
viagra without prescription
female viagra sale uk
how do get a prescription for viagra
viagra without prescription
can i take 150 mg viagra
viagra without a doctor prescription
long does one viagra pill last
viagra without prescription
gimonte sildenafil 50 mg
viagra no script
using cialis and viagra together
cialis vs viagra prices
viagra prices
good generic viagra
viagra prices
order viagra now
payday loans no credit check
payday loans no credit check
payday loans no credit
payday loans no credit check
payday loans online no credit check
payday loans online no credit check
payday loans online no credit check
payday loans online no credit check
buy cialis levitra
vardenafil 20mg
buy levitra mastercard
vardenafil
discount levitra pills
vardenafil 20mg
buy levitra uk online
vardenafil
best place to buy generic levitra
levitra discount card
levitra 20 mg
member php buy levitra
levitra
levitra sales
vardenafil 20mg
buy viagra cialis levitra online
levitra
cheap viagra levitra
payday loans no credit check
payday loans no credit check
payday loans online no credit check
payday loans no credit check
cheap cialis nz
cialis generic
order-cialis.com
cialis generic
buy cialis vegas
cialis prices
order cialis australia
cialis prices
where to buy cialis online
discount card viagra
buy viagra
how can i stop getting viagra emails
viagra online pharmacy
how long does viagra last 50 mg
viagra online
where to buy viagra without prescriptions
cheap viagra online
sales viagra uk
cialis 5 mg vs viagra
viagra online
has anyone ever ordered viagra online
buy viagra
viagra buy chemist
viagra online
cialis and viagra together
generic viagra online
generic viagra sold usa
where is the best place to buy cialis online
cialis price
http://www.sildenafil.gr/buy_cialis.html
cialis best price
can you buy real cialis online
cialis cheap
cheap cialis for sale
cheap cialis
cialis sale toronto
cheap cialis online canadian pharmacy
cialis best price
how to order cialis online
cialis cost
can cialis pills be split
cialis price
buy now viagra cialis
cialis prices
female cialis pills
п»їcasino online
casino games
online casino
п»їcasino online
free casino games
online casino
free casino games
п»їcasino online
online casino
free casino games
casino games
free casino games
real money casino
online casino
casino online
casino online
casino online
casino online
casino games
free casino games
casino games
free casino games
online casino
casino games
free casino games
casino games
casino online
real money casino
sildenafil 100mg kaufen
viagra without presciption online
black market viagra price
viagra without a doctor prescription online
can you get viagra on nhs prescription
viagra cost
viagra 50mg funciona
viagra cheap
how long before viagra become generic
online casino
real money casino
casino games
casino games
online casino
real money casino
real money casino
online casino
casino online
casino games
casino online
free casino games
online casino
real money casino
online casino
free casino games
casino games
casino online
online casino
casino online
americash payday loans
personal loans
bad credit faxless payday loans
3 month payday loans
slots for free
casino slots free
slots free
slots casino games
same day payday loans
get cash now
can payday loans garnish your wages
cash advances
download autocad electrical 2012
autodesk autocad
downloads autocad 2011
autocad viewer
autocad 2013 64 bit download
autodesk autocad
autocad car design software
cad
autocad keys
viagra online in 24 ore
buy viagra online
do i need prescription to buy viagra
online viagra
cipla viagra online
viagra cheap
what color are viagra pills
cheap viagra
generic viagra webmd
can buy viagra canada
online viagra
where can i buy viagra in brisbane
order viagra online
pills better than viagra
viagra cheap
buy viagra spam
viagra prices
generic viagra from the uk
getting an erection without viagra
buy viagra online
cheap generic viagra co uk french kamagra
online viagra
buy viagra online illegal
lowest prices on viagra
donde se puede comprar viagra en mexico
cheap viagra
online viagra bestellen
viagra gel online uk
buy viagra
where to buy viagra in canada
order viagra online
br cheap viagra cheap cialis
best price viagra
sildenafil 100mg dapoxetine 60mg
best price viagra
viagra 100 mg prezzo in farmacia
casinos in us
sizzling 777 slots free online
usa online slots real money
absolutely free slots for fun
buy cialis 10mg
cialis 20 mg
cialis tadalafil lilly
cialis no prescription ’
free triple 777 slot games
harrah's casino locations by state
game slots
free casino games slots no download
what do viagra pills do to men
viagra without a prescription
se comprar viagra generico farmacias
non-prescription viagra
sildenafil citrate 100 mg cipla
viagra
has the price of viagra gone up
viagra prices
viagra 800mg
online casino play for free
online casino bovada
best us casinos online
free casino games slots no download
prescrizione del viagra 50 mg
viagra without a prescription
viagra 50 mg pfizer precio
viagra without a doctor's prescription
is it possible to buy viagra over the counter
buy generic viagra
viagra 100mg vs cialis
viagra generic
buy viagra from boots online
cut viagra pill half
viagra without prescription
discreet viagra online
viagra without prescription
is viagra illegal to buy online
generic viagra online
viagra discount coupons
viagra generic
sildenafil citrate 100mg red
buy genuine viagra canada
viagra without doctor
cialis 20 mg vs viagra 100mg
viagra without prescription
viagra professional 100 mg pills
viagra generic
generico de viagra en farmacias
generic viagra 100mg
novo sildenafil price
cvs online pharmacy
canada pharmacy
canadian living recipes
online pharmacy
real canadian superstore flyer
approved canadian online pharmacies
online pharmacies in usa
online pharmacies canada
Walgreens Pharmacy
canada pharmacy online
online pharmacy
canadian pharmacy
canada pharmacies
northwest pharmacy canada
online pharmacies canada
real canadian superstore flyer
online pharmacies canada
prescription drugs online without
viagra sale no prescription uk
viagra without prescription
viagra 25 mg erfahrungsberichte
viagra without a doctor prescription
viagra south africa for sale
viagra without a doctor prescription walmart
viagra pills women
viagra without a doctor prescription walmart
buy viagra singapore
virtual blackjack casino machines
roulette game
gambling washington state
play roulette for free
best blackjack online no download
hypercasinos
play slots online for cash
free online casino
real roulette for ipad
free slots online
offshore internet casinos
virgin slots
legit online blackjack for money
online casino queen of the nile
vegas tech online casinos
online blackjack usa legal
usa casino paypal
online gambling blackjack
beste online casinos roulette
casino games no download
roulette casino game
online gambling for real money usa
casino online
online slot gambling us sites
online casinos for us players
slots internet
cialis for sale australia
generic cialis at walmart
buy real cialis cheap
generic for cialis
buy cialis europe
cialis online
order female cialis
cialis online
buy cialis tadalafil
brand viagra 50mg online
generic sildenafil
can you get viagra in amsterdam
sildenafil online
is cialis cheaper than viagra
generic for viagra
sildenafil citrate sublingual tablets 100 mg
generic viagra
viagra cheap fast
online pharmacy low price viagra
generic sildenafil
how long does it take for viagra to get out of your system
sildenafil price
viagra and adderall together
viagra generic
sildenafil citrate generic canada
buy generic viagra
sildenafil 50 mg northia
autocad student desk
autocad 2015
autocad student download mac
autocad 2017
transfer autocad license
autocad software
autocad electrical 2011 download
autocad 2013
autocad 2017 online
autocad viewer
download software autocad
autocad 2017
autocad 2000 download
autocad lt
autocad architectural drawings download
autocad 2016
autocad 2002 serial number and product key
autocad inventor
cheap autocad software for sale
autocad gratis
autocad civil 3d 2017 serial number
autocad 2016 download
download software autocad 2017 full version
autocad 2017 download
autocad raster design 2017 download
buy used autocad license
autocad 2007
autocad numbering lisp
autocad gratis
student autocad 2016
autodesk autocad
autocad architecture 2011 serial number
autocad estudiantes
autocad revit architecture suite 2012 download
acad
autocad 32 bit installer download
autocad inventor
autocad 2017 product license activation code
autocad 2017 download
autocad student pricing
autocad gratuit
downloads autocad
autocad gratis
autocad architecture 2011 64 bit download
autocad student download
hatch pattern autocad download
autodesk student download
autocad shop drawings
autocad software
autodesk autocad 2011 download
new weight loss medication
supplements for weight loss
weight loss pills
weight loss drugs
microsoft windows live mail
windows updates
microsoft updates
windows live sign in
windows 10 upgrade assistant
is generic viagra legal in australia
viagra without prescription
viagra generico como chama
viagra online
viagra levitra cialis price comparison
viagra
safe buy viagra online uk
viagra price
buy viagra with paypal
microsoft solitaire collection
windows store
windows update catalog
windows store
windows
buy cialis safely online
cialis coupons 2018
order generic cialis online
cialis prices
buy cialis online in usa
cialis coupon
best place to order generic cialis
generic cialis pills
where to buy generic cialis in canada
cheap cialis/ viagra levitra
cialis
how to buy cialis over the counter
cialis coupons 2018
order cialis phone
tadalafil online
taking 2 cialis pills
tadalafil cost
cheapest price on cialis
support.microsoft.com/help
update windows 10
microsoft windows 8.1
upgrade to windows 10
microsoft 360
update windows 10
windows update
windows live
windows 10 upgrade
login microsoft
how long does half a viagra pill last
viagra without doctor
viagra online pharmacy europe
viagra without a doctor prescription
where can i buy viagra online uk
viagra prices
viagra buy cyprus
viagra pills
buying viagra online canada
order real cialis online
buy cialis online
cheap cialis uk generic
cialis prices
cheap cialis thailand
cialis coupons
can you buy cialis online no prescription
cialis coupon 20 mg
cialis sale canada
portal office
microsoft store
download microsoft store
office download
microsoftword
wrd
microsoft store
microsoft office 365 sign in
microsoft word
store microsoft
can you get viagra over the counter australia
viagra
can take two 25mg viagra
viagra online
but get right back up like viagra
generic viagra
viagra o simili generici farmaci
generic viagra online
take sildenafil citrate 100mg
microsoft word 2010 free download
microsoft excel
purchase microsoft office
microsoft store
word 2017
celebrex generic
buy flagyl online
flagyl online
finasteride
voltaren
voltaren 100 mg
finasteride
word download
microsoft office
office365
office online
free microsoft office download
can buy viagra australia
viagra no prescription
cheap viagra cialis uk
viagra without doctor
viagra at discount prices
viagra pills
4 tabl. kamagra sildenafil citrate 100mg
viagra cheap
online viagra australia
portal office 365
microsoft office
microsoft company store
office 2013
words
free real money casino no deposit
casino games free
casino online
casino online loc us
cialis viagra levitra for sale
how much does levitra cost
where to buy levitra online no prescription
buy generic levitra
best place to order levitra
order levitra super active oo
levitra 20
canada levitra buy online
levitra coupons
buy levitra in germany
sildenafil india online
viagra without a doctor's prescription
will make generic viagra
viagra without prescription
buy real viagra online uk
buy viagra
generic viagra vs brand name
online viagra
how to take viagra pills
get viagra samples
viagra without prescription
que es viagra generico
viagra without prescription
cheap viagra with prescription
viagra pills
online generic viagra india
buy viagra
does generic viagra work yahoo answers
buy cialis europe
cialis
cheap 2.5 mg cialis
buy cialis
buy cialis brand
cialis generic
where can i buy real cialis
generic cialis 2018
cialis 20mg cheap
buy cialis online canada
online cialis
order cialis no prescription canada
buy cialis online
generic cialis order
buy generic cialis online
cheap cialis pills online
buy generic cialis online
buy cialis in costa rica
casino games
free real money casino no deposit
free online casino
play casino games online
vegas casino games
top online casino
kasino
new usa online casinos 2017
http://ancc.us/ InetueneDerce , Great Information About Erecting A Steel Building
viagra generico brasil
viagra without doctor
quanto custo o generico do viagra
viagra without a doctor's prescription
online viagra pharmacy
order viagra online
viagra buy online canada
buy viagra online
viagra cost 100mg
canadian viagra pills
viagra without a doctor's prescription
buy viagra euro
viagra no prescription
how to get your go to prescribe viagra
viagra
cuanto sale una caja de viagra
buy viagra
oz pills viagra
trust org comprar viagra spain
viagra without prescription
buying viagra online overnight delivery
viagra without a doctor prescription
canadian pharmacy to buy viagra
buy viagra online
sildenafil generico
viagra online
prijs van viagra pillen
viagra women india price
viagra without doctor
contraindicaciones de sildenafil 50 mg
viagra without prescription
buy viagra uk online
buy viagra
cheap viagra or cialis
buy viagra online
viagra women price
quick loans no credit quick loans quick loans quick loans
canada pharmacies online prescriptions
prednisone
Online Pharmacies
prednisone 20 mg
canadian pharmacy online
furosemid
northwest pharmacy canada
lasix
Canadian Pharmacy
online gambling sites for real money
biggest no deposit welcome bonus
best online casino games free
online casino no deposit bonus
canada pharmacy
prednisone 20 mg
Canadian Online Pharmacy
prednisone
List of Safe Online Pharmacies
furosemide 40 mg
canadian online pharmacy
lasix medication
canadian living recipes
b http://viagrraver.com viagra generic name
what happens when a man without ed takes viagra
buy generic viagra when did the fda approved viagra
pharmacy online
prednisone
pharmacy online
prednisone 20 mg
International Pharmacies that Ship to the USA
furosemide 20 mg
canada drugs
furosemide 40 mg
lloyds pharmacy online uk
generic drugs generic viagra generic Viagra online buy generic viagra
online casino gambling
online gambling casino
casino games slots
casino games slots
viagra sale forum
online prescriptions
viagra sale karachi
online prescription
buy viagra from pfizer
online prescriptions
viagra buy in tesco
viagra prices
buy viagra by pfizer
Knight's tactic clearly, today is to cling to garage, do not give him any likelihood, and Kevin durant is always private with defense. But garage or under heavy defensive look for opportunities, such as experience stephen curry shoes low, he mobilized, make use of the other fear his edge ability garage easily scored two points.
The last 80 seconds inside first half, durant overlooked shots from outside, your basket three players are knights, including Thompson, lebron, subsequently, the Treasury rushed into the basket from the extended position, unexpectedly the offensive rebounds inside the knight encirclement! Then he / she points ball durant, which finished scores!
And the second half, knight to defensive strategy is shaken, they don't have excessive double again, help, curiously, JR in 1 on 1 against Arsenal, and directly put this garage was pushed to the ground.
Sure enough, the actual knight defensive shaken curry shoes immediately after scoring started rising with his Arsenal, outside his 3-pointer by continuous, during those times he was given the chance to just like Kevin durant got chance inside first half. After three points in the database is still hit, he this section one bomb under the 14 points.
Today is usually June 1, the time kevin durant shoes would be the international children's day, it seems in the "primary school" is probably the holiday today.
Small garage finish I rested the majority of the holiday to battle, he is still the contribution towards the brilliant stroke, but furthermore pass a 3-pointer by means of Kevin durant. The very last 3 minutes, garage off in front of schedule, because the activity had no suspense.
Tag: kyrie irving shoes puma fenty curry shoes kyrie shoes lebron soldier 10 kd 10 nike kyrie 4 kyrie irving jersey adidas alphabounce lebron james shoes Lebron soldier 11 curry 3 kyrie irving jersey curry 3 shoes adidas iniki kobe 10 stephen curry basketball shoes air jordan shoes adidas crazy explosive adidas yeezy boost 350 v2 zebra canada goose ugg 5815 kyrie 4 confetti vans sk8 hi nike lebron 14 adidas rose 6 curry 2 kyrie 3 balenciaga shoes adidas boost puma fenty puma fenty hyperdunk 2017 kyire 3 kyrie 4 adidas terrex
buy cialis canada paypal
generic cialis
buy cialis manila
generic cialis
buy generic viagra cialis levitra
cialis
where can i order cialis online
cialis
cheapest way to buy cialis
cheapest cialis on the internet
cialis generic
best place to buy cialis online
buy generic cialis online
cheapest price generic cialis
cialis online pharmacy
buy levitra cialis viagra
cialis online pharmacy
caverta cheap cialis generic viagra
old do u have buy viagra
buy viagra online
when did viagra get fda approval
buy viagra
viagra online coupons
viagra without doctor
comprar viagra generico contrareembolso
viagra without a doctor prescription
viagra online ohne rezept kaufen
Viagra generico generic viagra buy generic Viagra buy generic viagra
pfizer monopoly on viagra generic viagra is avanafil better than viagra
generic viagra online can you take viagra with vicodin
http://viagratru.com - buy brand viagra online australia
buy viagra soft tabs
viagra without doctor
viagra how long does it last with 100 mg
viagra without a doctor prescription
generico viagra citrato sildenafila
viagra without a doctor prescription
using viagra get pregnant
viagra no prescription
fda approval generic viagra
cialis and viagra generic
buy viagra
order viagra pfizer
buy viagra
buy viagra without rx
generic viagra online pharmacy
difference 50mg 100mg viagra
generic viagra online
long will 100mg viagra work
viagra 50 mg dose
buy viagra
cialis 20mg e viagra
online viagra
prices of viagra in pakistan
viagra generic
100mg viagra cialis equivalent
generic viagra online
viagra generico pastiglie morbide
viagra without prescription viagra without prescription
viagra cheap prices
viagra without doctor
cheap viagra sale uk
viagra without a doctor prescription
experience research cheap viagra
viagra without doctor
viagra sale edmonton
viagra no prescription
viagra for sale atlanta
Truly when someone doesn't understand afterward its up to other users that they will help, so here it happens.
viagra on line
viagra sale fast shipping
buy sildenafil
cialis viagra levitra online
online viagra
will generic viagra available united states
buy viagra online
buy viagra creme
generic viagra online pharmacy
buying viagra online dangerous
generic viagra online
how to buy viagra at boots
buy viagra portland
viagra online
happens you take cialis viagra together
buy viagra online
viagra sales rep
buy generic viagra online
levitra generic cialis viagra
viagra generic
viagra generic price
adobe flash cs6 download
adobe cs6 master collection
cc6
adobe creative cloud download
descargar creative cloud
adobe photoshop cc
adobe de
photoshop cs6
creative market
adobe connect
creative suite
adobe subscription
adobe cs6 master collection
adobe creative cloud installer
photoshop cs6
flash cs6
adobe photoshop cc 2017
adobe flash player インストール
adobe acrobat download
creative suite
adobe premiere elements
adobe creative suite
creative planning
adobe photoshop cs5
download adobe reader
adobe photoshop cs6
adobe flash player update
pink cialis pills
buy cialis online
buy cialis sydney
buy cialis online
buy cialis new delhi
generic cialis
cheapest canadian pharmacy for cialis
generic cialis online
how do i buy cialis
payday loans no credit payday advance online easy loans no credit check payday loans no credit check same day
car insurance quotes comparison car insurance quote compare auto insurance rates online geico quote auto insurance
girl webcam online girls hamster cam hamster cam
loan 1000 loan application apply for a loan loan application
cash loans online paydayloans lenders cash loans online need money now
viagra pill women
viagra england
viagra online affidabile
viagra for sale uk
viagra brand online uk
viagra pill
buy name brand viagra
viagra pills 100 mg
viagra online ordering
viagra 100mg fta 4 st
viagra without doctor
how can i buy viagra in canada
viagra without prescription
himalayan viagra for sale
viagra generic
bula generico viagra ems
viagra generic
viagra generic available us
bayview loan servicing bad credit loans guaranteed approval poor credit loans guaranteed approval fast online loans
full coverage auto insurance quotes acceptance auto insurance insurance auto full coverage car insurance
loans online large payday loans direct lender loan loans online
online loans payday loans online same day online loan best online loans
car insurance quotes in georgia car insurance quotes car insurance quotes compare multiple auto insurance quotes
buying viagra online in ireland
viagra without doctor
illegal order viagra canada
viagra without a doctor's prescription
where to buy viagra in san diego
generic viagra
is online viagra legit
buy generic viagra online
wie lange wirken 100mg viagra
chat chat isexy chat sexchatsexchat
best personal loans get a payday loan unsecured personal loans personal loans online
comprare viagra generico line
viagra without a prior doctor prescription
cost generic viagra canada
viagra without a doctors prescription
sildenafil bifort m 50 mg
buy viagra online
viagra and adderall together
buy viagra online
cheapest place to buy viagra in uk
guaranteed loans payday cash loan consolidation cash payday
cam girl girls girls girls
payday loans online reviews cashadvance 100 day payday loan bad credit loans guaranteed approval
credit loans guaranteed approval payday loans for bad credit poor credit loans guaranteed approval poor credit loans guaranteed approval
installment loans no credit check payday loans no credit check loans no credit check payday cash loan
rates on personal loans loans online online loan rates on personal loans
cam girl camgirlslive cam girl web chat
live sex webcam free porn chat free live cam live sex webcam
teen webcam masturbation free cams adultchat free chat cam
webcams webcams webcams livecam
web cam sex cyber sex chat live porn cam sex cams
bbw cam free sex cams sex cams free cam sites
academic paper paper writing service papers paper write
canadian pharmacy cialis
canada pharmacies online prescriptions
Legitimate Online Pharmacies
legitimate canadian mail order pharmacies
online pharmacies in usa
canada pharmacies online prescriptions
canadian pharmacy online
legitimate canadian mail order pharmacies
reputable canadian online pharmacies
legitimate canadian mail order pharmacies
Online Drugstores
canadian pharmacies online prescriptions
online pharmacies that do not require a prescription
pharmacy online
legitimate canadian mail order pharmacies
canadian pharmacy online
canadian pharmacies online prescriptions
best canadian mail order pharmacies
legitimate canadian mail order pharmacies
best canadian mail order pharmacies
canada pharmacies online prescriptions
canadian pharmacies
canada pharmacies online prescriptions
canadian pharmacies shipping to usa
legitimate canadian mail order pharmacies
canada drug
best insurance best insurance insurance for cars best insurance
difference with 50 mg and 100mg viagra
viagra pills
cost of viagra 100 mg
buy viagra online
cheaper viagra cialis levitra
generic viagra without script
who can get viagra on prescription
generic viagra
buy viagra on prescription
unsecured loans lenders wells fargo loan get a loan loan application
sildenafil 100 mg gel
generic viagra 100mg
buy viagra overseas
generic viagra
taking a half pill of viagra
viagra without a doctor prescription
viagra generic online pharmacy
viagra without a doctor prescription
samples of viagra online
valor do viagra generico
generic viagra without script
take cialis viagra together
generic viagra online
cual es el nombre generico de viagra
viagra without a doctor prescription
costo viagra 10 mg
viagra without a doctor prescription
buy online viagra in pakistan
chatib no registration webcams free web cams free webcams
direct lender installment loans lenders payday loan online bad credit lenders
nude webcam webcam nude nude cams naked cam
cams free porn chat cams teen girl webcam
does generic viagra works
buy generic viagra
sildenafil 100mg viagra
generic viagra without script
hard get doctor prescribe viagra
viagra without a doctor prescription
sildenafil calox 100mg
viagra without a doctor
generic viagra no prescription necessary
payday loans online personal loans online online loan free loans no credit check
milf webcam free erotic chat free webcam girls cam girls
free web cams webcam bongacams sluts online
nude web cams nude cam naked naked
advance cash advance cash online payday advance payday advance
kamagra reviews forum
kamagra oral jelly usa
kamagra oral jelly vs viagra
kamagra oral jelly for sale in usa illinois
come si usa kamagra oral jelly
amateur webcam cam girl girl webcam cam girl
loans default payday loans in missouri payday advance payday advances
buy cialis in usa
cialis coupon
buy cialis taiwan
cialis pills
super cialis cheap
cialis generico
cialis rush order
cialis 20 mg
buy cialis uk cheap
argument essay easy argumentative essay good argumentative essay easy argumentative essay
order cialis safely online
cialis coupon
buy daily cialis
cialis 20mg prix en pharmacie
order cialis canadian pharmacy
cialis 5 mg
what are cialis pills for
cialis 20 mg
buy generic cialis online in usa
live girl amateur girls masturbating girl cams free online porn cams
loan lenders bad credit loans online loan lenders payday lending
payday loan lenders payday loan lenders pay day board game bad credit loans direct lenders
camfuze mother girls camgirls cam girl
essay writing essay writing service essay writing service essay writing service
good2go auto insurance usaa car insurance automobile insurance auto insurance cheapest rates
easy payday loan until payday fast payday payday express
mail order viagra online
viagra online sales
can you really order viagra online
viagra for sale uk
cuanto sale el viagra en la argentina
buying viagra online
viagra buy in usa
viagra online
can buy viagra vietnam
fuck show free adult cam to cam video chat my free cam cams
need cash now need a loan person to person loans cash advance direct lenders only
one hour payday loan cash lenders lenders money lender
easy payday loans fast payday payday loan fast easy payday
is there a generic brand for viagra
sex pills
sale of viagra in tescos
ed pills
sildenafil actavis 100mg opinie
sex pills
cheapest ever kamagra
erectile dysfunction pills
buy viagra in northern ireland
buy professional cialis
ed pills
viagra sale manila
erectile dysfunction remedies
prices for viagra 100mg
ed pills that work
can you buy viagra ebay
erection pills
price of 100mg viagra
can i take 100mg viagra
ed pills
buy viagra sildenafil online
ed pills that work
buy viagra in ahmedabad
best ed pills
best prices for cialis
best ed pills
generic levitra in uk
freewebcams webcam free porn amateur webcam sex
cialis discount australia
cialis
cialis pills australia
cialis
order brand name cialis
cialis usa
brand cialis for sale
cialis canada
what cialis pills look like
loans company bad credit loans guaranteed approval bad credit personal loans guaranteed approval bad credit loans guaranteed approval
best place to buy cialis online
generic cialis online without script
buy cialis new zealand
generic cialis online without script
best place buy generic cialis
cialis online
buy cialis professional
cheap cialis
order cialis online in canada
hairy pussy cam free sex cams teen masturbation cam sex cam
loans online payday loans online online loans loans online
cialis sale nz
cialis
cheap cialis canadian
cheap cialis
buy cialis no prescription canada
cialis tablets
cheapest cialis new zealand
cialis canada
cheapest cialis au
car loans for bad credit payday cash fast cash advance debt consolidation loan low interest
buy cialis online with no prescription
buy generic cialis
buy cialis delhi
generic cialis online pharmacy
cialis description of pills
buy cialis online
buy cialis online no prescription canada
buy cialis
cheap-cialis.net
nude webcam myfreecam my free porn cam porn live webcam
hot webcam live girls myfreecams mobile naked girls
buying cialis in london
generic cialis online pharmacy
want buy cialis uk
buy generic cialis
buy cialis brand online
cheap cialis
what cialis pills look like
buy cialis
buy cialis online canadian no prescription
buy cialis online cheap
buy cialis
cheapest cialis 20mg
cialis
buy cialis taiwan
canadian cialis
buy cialis au
cialis canada
afgan pills cialis index
effective cover letter help with a cover letter employment cover letter cover letters
buy cialis daily use
generic cialis
the cheapest generic cialis
generic cialis
generic cialis on sale
buy cialis online
cheap cialis canada pharmacy
cialis
buy cheap generic cialis online
best auto insurance www.thegeneral.com auto insurance online car insurance quotes best auto insurance
order cialis online pharmacy
buy cialis online
is it legal to order cialis online
cialis
how to order cialis online
cialis canada
buy cialis online mastercard
cialis tablets
buy cheap cialis uk
payday loans bad credit bad credit installment loans guaranteed bad credit installment loans guaranteed bad credit loans direct lenders
cheapest viagra in the uk
buy generic viagra online
buy viagra gel
viagra generic
viagra online expressversand
viagra tablet
singapore viagra online
viagra tablets
cheap viagra for women
writing service paper write writing services essay writing service
Add Your Comments
|